Article Text

Statistics from Altmetric.com
Background
In hospital practice, pleural aspiration (thoracocentesis) and chest drain insertion may be required in many different clinical settings for a variety of indications. Doctors in most specialities will be exposed to patients requiring pleural drainage and need to be aware of safe techniques. There have been many reports of the dangers of large-bore chest drains and it had been anticipated that, with the previous guidelines, better training and the advent of small-bore Seldinger technique chest drains, there would have been an improvement. Unfortunately the descriptions of serious complications continue, and in 2008 the National Patient Safety Agency (NPSA) issued a report making recommendations for safer practice.1 These updated guidelines take into consideration the recommendations from this report and describe the technique of pleural aspiration and Seldinger chest drain insertion and ultrasound guidance. Much of this guideline consists of descriptions of how to do these procedures but, where possible, advice is given when evidence is available.
Training
All doctors expected to be able to insert a chest drain should be trained using a combination of didactic lecture, simulated practice and supervised practice until considered competent. (✓)
Before undertaking an invasive pleural procedure, all operators should be appropriately trained and have been initially supervised by an experienced trainer. Many of the complications described in the NPSA report were the result of inadequate training or supervision. A recent survey of UK NHS Trusts showed that the majority did not have a formal training policy for chest drain insertion in 2008.2
Studies of clinical practice have shown that there is a wide variation in the knowledge and skills of doctors inserting chest drains. In a published study3 where doctors were asked to indicate where they would insert a chest drain, 45% indicated they would insert the drain outside of the safety triangle, with the majority of incorrect answers being too low. Knowledge of the correct position was higher in the group with cardiothoracic surgery experience and higher in doctors with competence to insert drains without supervision.
Training should include a theoretical component describing the risks and technique, as outlined in this document, prior to assessed manikin practice and finally supervised procedure until considered competent. In the UK it is currently part of the curriculum for core medical training and trainees should be expected to describe the procedure and complications in an examination. The trainee should ensure each procedure is documented in their log book and signed by the trainer. A Directly Observed Practice (DOP) assessment should be completed in support of this.
Studies of training involving didactic lectures, manikin practice and following protocols, including use of sedation and anaesthesia, have shown the risk of complications and patient pain and anxiety can be reduced4 and trainee knowledge and confidence in the procedures may be increased.5
The use of simulators has been compared with the use of animal models for blunt dissection as part of ATLS training. Forty-one trainees and 21 experts were asked to evaluate a simulator compared with an animal model and they were found to be equivalent in most areas apart from anatomical landmarks where the simulator was superior and the blunt dissection where the animal model was superior.6
Training for thoracic ultrasound should follow the principles set out by the Royal College of Radiologists and is described in greater detail later in this document.
These guidelines will aid the training of junior doctors in these procedures and should be readily available for consultation by all doctors likely to be required to carry out pleural aspiration or chest tube insertion. An algorithm for the insertion of a chest drain is shown in figure 1.
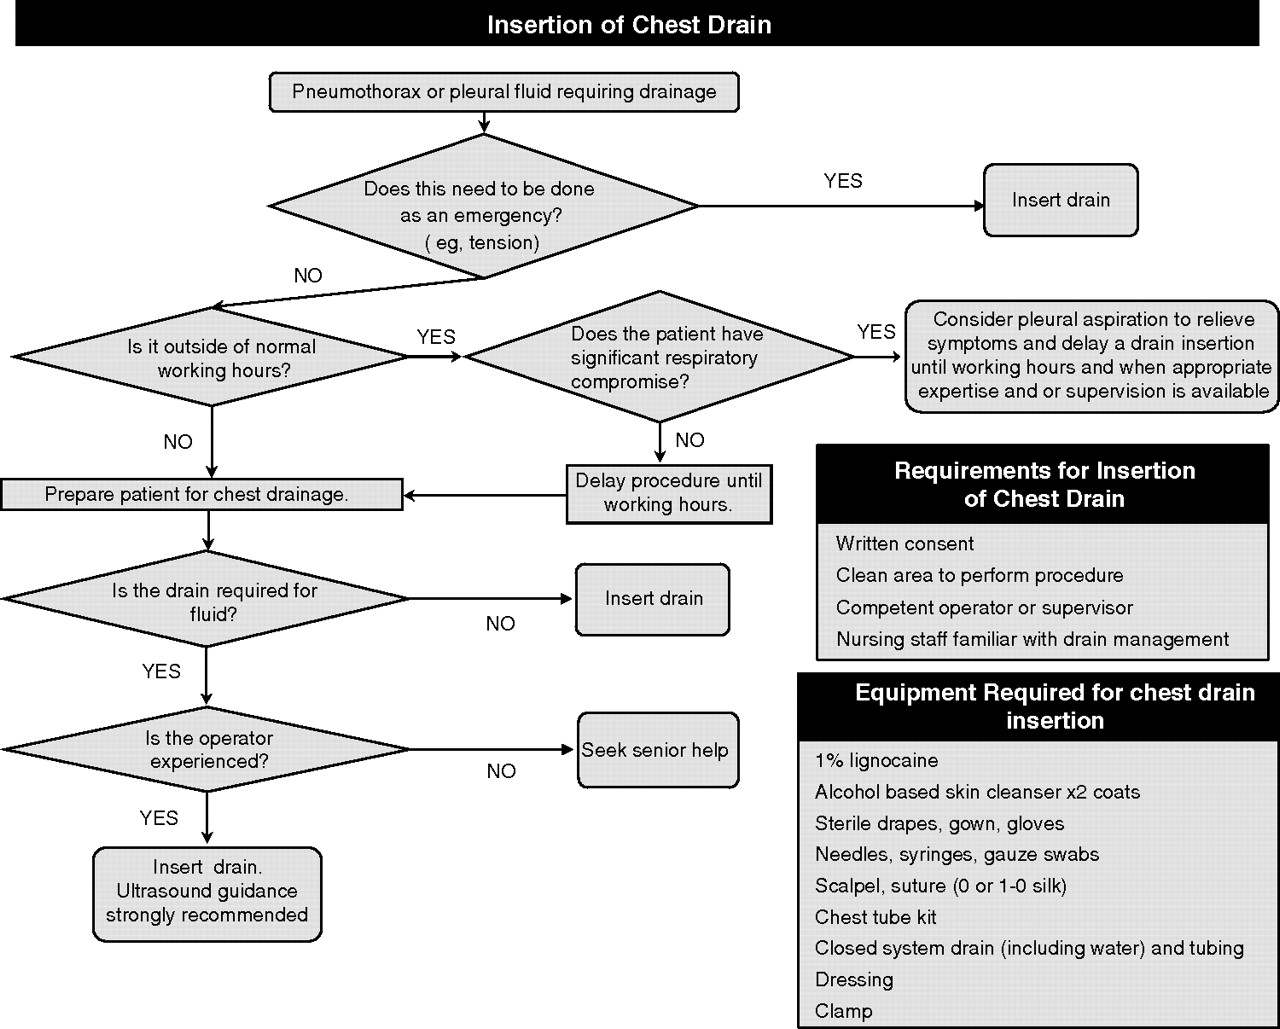
Algorithm for the insertion of a chest drain.
Pre-procedure preparation
Timing of procedures
Pleural procedures should not take place out of hours except in an emergency. (✓)
Complications of most surgical procedures are higher when performed after midnight. Most pleural procedures do not need to be performed as an emergency and therefore should not be carried out overnight except in the case of significant respiratory or cardiovascular compromise. It may be considered in certain circumstances that pleural aspiration is safer than a chest drain.
Aseptic technique
Pleural aspirations and chest drains should be inserted in a clean area using full aseptic technique. (✓)
Empyema and wound site infections are significant complications of pleural procedures.
A large area of skin cleansing should be undertaken using two applications of alcohol-based skin disinfectant (or other if recommended by the local infection control team), allowing it to dry in between applications. The procedure should be carried out in a clean area appropriate for such procedures.
Clotting disorders and anticoagulation
Non-urgent pleural aspirations and chest drain insertions should be avoided in anticoagulated patients until international normalised ratio (INR) <1.5. (C)
Patients known to be receiving anticoagulants or in whom there is a suspected coagulopathy (eg, liver failure) should have their prothrombin time (PT) or international normalised ratio (INR) measured prior to a non-urgent pleural procedure. In the case of a tension pneumothorax, it may be necessary to insert a drain first before correcting an abnormal INR. McVay et al7 retrospectively reviewed 608 cases undergoing paracentesis or pleural aspiration and found that mild coagulopathy, defined as an INR <1.5 or platelet counts 50–99 109/l, did not adversely affect the risk of bleeding with a fall in haemoglobin of 2 g/dl occurring in only 3.1% and 0.2% requiring transfusion.
If a patient has abnormal coagulation and requires an invasive pleural procedure, the advice of the local haematologist should be sought regarding the correct action needed to normalise the clotting.
Pleural aspiration (thoracocentesis)
Pleural aspiration describes a procedure whereby pleural fluid or air may be aspirated via a system inserted temporarily into the pleural space. This may be for diagnostic purposes (usually removing 20–50 ml fluid) or therapeutic to relieve symptoms. In the literature it is varyingly called thoracocentesis, thoracentesis or pleural aspiration.
Indications
The indications for pleural aspiration are shown in box 1.
Box 1 Indications for pleural aspiration
Pneumothorax*
Spontaneous primary pneumothorax (any size)
Small secondary spontaneous pneumothorax in patients under 50 years
Malignant pleural effusions*
Small volume aspiration for diagnosis
Larger volume aspiration to relieve symptoms of dyspnoea
Pleural effusion associated with sepsis (suspected empyema)*
Diagnostic for decision to drain
* Refer to specific guidelines for further detail.
Preparation and consent
Before performing a pleural aspiration, operators should ensure documented consent is obtained and that they are either competent or supervised to do the pleural aspiration. They should be aware of the indication for the procedure, whether it is diagnostic or therapeutic and have all equipment ready.
The consent procedure should encompass the indications for the procedure, alternatives to the procedure and the common and serious complications.
Complications
The commonest complications from pleural aspiration are pneumothorax, procedure failure, pain and haemorrhage. The most serious complication is visceral injury. These complications should be included in any consent process. (✓)
A number of factors have been reported to increase the frequency of complications following pleural aspiration. The broadest agreement across the studies examined was that increased operator experience and the use of image guidance reduced the frequency of complications. A fixed effects meta-analysis calculation of the complication frequency across all the studies examined according to these two factors is shown in table 1.
Complication rates of pleural aspiration by operator and image guidance
Other factors such as the needle size used and the volume of fluid aspirated have been shown in a few studies to have an effect and are discussed below. Underlying chronic obstructive pulmonary disease8, previous radiotherapy9 and previous pleural aspiration10 have also been suggested as risk factors in individual studies and more evidence is required before recommendations can be made.
In many studies pneumothorax is the most commonly occurring complication following pleural aspiration, but the pathophysiology of post-aspiration pneumothorax is likely to be multifactorial. Some pneumothoraces are undoubtedly caused by lung injury or introduction of air during the procedure. However, Boland et al, in a retrospective study of 512 pleural fluid aspirations, found that 17 of the 29 pneumothoraces requiring catheter drainage did not resolve with drainage. They termed this an ‘ex vacuo’ pneumothorax. All of the 17 patients had malignant parenchymal lung disease. Interestingly, despite the presence of the ex vacuo pneumothorax, 14 of the patients found an improvement of their dyspnoea after the aspiration of their pleural effusion.11
The authors concluded that these pneumothoraces occurred due to unexpandable lung underlying the pleural effusion—what many sources refer to as ‘trapped lung’. The aspiration of the pleural fluid then causes significantly low pressure within the pleural space and air is drawn in. The mechanism by which this occurs has not been fully determined. Other authors have supported this view.12
Ponrartana et al confirmed the finding that chest drain insertion as a treatment of an ex vacuo pneumothorax is unlikely to be helpful in decreasing the size of the pneumothorax. They also found that the presence of an ex vacuo pneumothorax in the context of malignant disease is associated with a poor prognosis.13
We conclude that, if an ex vacuo pneumothorax occurs after drainage of a pleural effusion due to non-expansile or trapped lung, the pneumothorax should not routinely be drained. Drainage of the pleural effusion if it recurs may bring symptomatic relief. Indwelling pleural catheters may be useful in this context.
Only one case of injury to a solid viscus was found in the context of a cohort or case series,14 although several examples of other visceral injuries are published in case reports. Despite the low reported frequency, studies of the accuracy of clinically placed pleural aspiration sites have revealed significant potential for visceral injury15 16 and this is discussed further in the section on image guidance (below).
Image guidance
A recent chest radiograph should be available prior to performing a pleural aspiration. (✓)
Thoracic ultrasound guidance is strongly recommended for all pleural procedures for pleural fluid. (B)
The marking of a site using thoracic ultrasound for subsequent remote aspiration or chest drain insertion is not recommended except for large pleural effusions. (C)
A recent chest x-ray is necessary to confirm the indication for the procedure and the side of the pathology. This should be correlated with the clinical signs. The only exception should be the case of a tension pneumothorax.
Ultrasound-guided pleural aspiration is associated with a lower failure rate and complication rate (see table 1). The procedure failures or ‘dry taps’ can themselves have further clinically significant complications such as visceral injury.14 Some studies have shown that pleural aspiration in the hands of experienced operators can achieve low complication rates when conducted without image guidance.17 18 Table 1 also shows that the use of image guidance can reduce the post-procedure complications even of experienced operators, and a large study of clinical placement of pleural aspiration sites found that inaccurate site placement was independent of operator experience.15
There are four studies directly comparing blind pleural aspiration against an ultrasound-guided procedure. In a small randomised controlled trial (n=52) the failure rate (a composite of dry tap and pneumothorax) was 33% with a blind procedure compared with no failures with ultrasound guidance.19 In a larger retrospective cohort study (n=342)20 the pneumothorax rate was 18% in the clinically localised pleural aspiration group compared with 3% in the ultrasound-guided group. Within the clinical localisation group were 48 patients with prior ultrasound marking in the radiology department but ward-based pleural aspiration (ie, ‘X marks the spot’); subanalysis of this group did not show any difference in the complication rate compared with clinical localisation only. Similarly, Kohan et al did not show any difference in complications between clinically sited versus remote ultrasound guidance (‘X marks the spot’).21 Another retrospective cohort study (n=523) showed a pneumothorax rate of 10.3% (4.9% requiring a drain) in the blind procedure group compared with 4.9% (0.7% requiring a drain) in the ultrasound-guided group.22
A large proportion of these failed blind procedures are probably due to inaccurate clinical site selection. In a study by Diacon et al,15 clinicians were only able to identify a site for a pleural aspiration in 67% of patients with a pleural effusion. In the cohort where a site was identified, 15% were inaccurate and would have resulted in puncture of the lung, liver or spleen. Where the clinician was unable to identify a site for aspiration, ultrasound localised a suitable site for aspiration in 54%. Overall, ultrasound prevented potential organ puncture in 10% of the procedures and increased the rate of accurate sites by 26%.
Thoracic ultrasound or other imaging is very important following a failed blind pleural aspiration. In a study of 26 patients who had a failed clinically-guided pleural aspiration, 38% had the procedure performed at the incorrect site, 31% had no pleural fluid present, 11% had loculations and 11% had intervening parenchymal consolidation or tumour. Factors associated with failure were a small pleural effusion, loculations and a sharp costophrenic angle on the chest x-ray. Operator inexperience was not associated with failure. Ultrasound-guided pleural aspiration was subsequently successful in 15 of the 17 patients in whom it was attempted.16 Similarly, Kohan et al demonstrated the efficacy of ultrasound-guided pleural aspiration following failed clinical procedures.21 Therefore, if a clinically localised pleural aspiration fails, image guidance should be performed and no further clinical attempts should be made.
Thoracic ultrasound is also useful in the presence of unilateral ‘white-out’ or opaque hemithorax on the chest x-ray. In a prospective study of 50 patients, nine had no pleural effusion present on thoracic ultrasound23 thereby avoiding inappropriate pleural aspiration and potential procedure-related injury.
It could be argued that thoracic ultrasound may not be necessary when aspirating a large pleural effusion that does not cause complete opacification of the hemithorax. In a randomised controlled trial comparing blind pleural aspiration against ultrasound guidance, there was a significantly higher incidence of dry taps in the presence of a small pleural effusion (obliterating less than half of the hemidiaphragm) and loculated pleural effusion. There was no difference in the rate of dry tap in the presence of a large pleural effusion.21 However, even in this instance, image guidance will reveal underlying abnormalities that are not apparent on plain film radiology such as cardiac enlargement or displacement, a raised diaphragm or adherent lung.
Overall, ultrasound-guided pleural aspiration has been shown to increase the yield and reduce the risk of complications, particularly pneumothoraces and inadvertent organ puncture. However, it should be noted that ultrasound may not reduce the incidence of laceration of the intercostal vessels because they are not visualised on ultrasound.24 The evidence leads us to conclude that, wherever possible, site selection for all pleural aspiration should be ultrasound-guided. Ultrasound guidance is strongly recommended when attempting to aspirate any pleural effusion. It is even more important when aspirating small or loculated pleural effusions where there is a near or completely radio-opaque hemithorax, particularly in the absence of mediastinum shift away from the side of the lesion or when a clinically-guided attempt has been unsuccessful. However, the use of image guidance does not replace the need for clinical judgement, especially when siting the needle within the intercostal space. The use of ultrasound also requires training and expertise as described later in this document.
Patient position and site of insertion
The preferred site for insertion of the needle for pleural aspiration should be the triangle of safety. (✓)
In determining the correct patient position and site of insertion, it is important for the operator to be aware of the normal anatomy of the thorax and the pathology of the patient. Patient position is dependent on the operator preference and the site of the pathology. In the case of a posterior lying locule, this may be specific to the image-guided spot where fluid is most likely to be obtained. In most circumstances, however, the site of insertion of the needle is either in the triangle of safety (figure 2) or the second intercostal space in the mid-clavicular line. The patient may therefore either sit upright leaning forward with arms elevated but resting on a table or bed, thereby exposing the axilla, or lying on a bed in a position similar to that described in the section on chest drain insertion below.
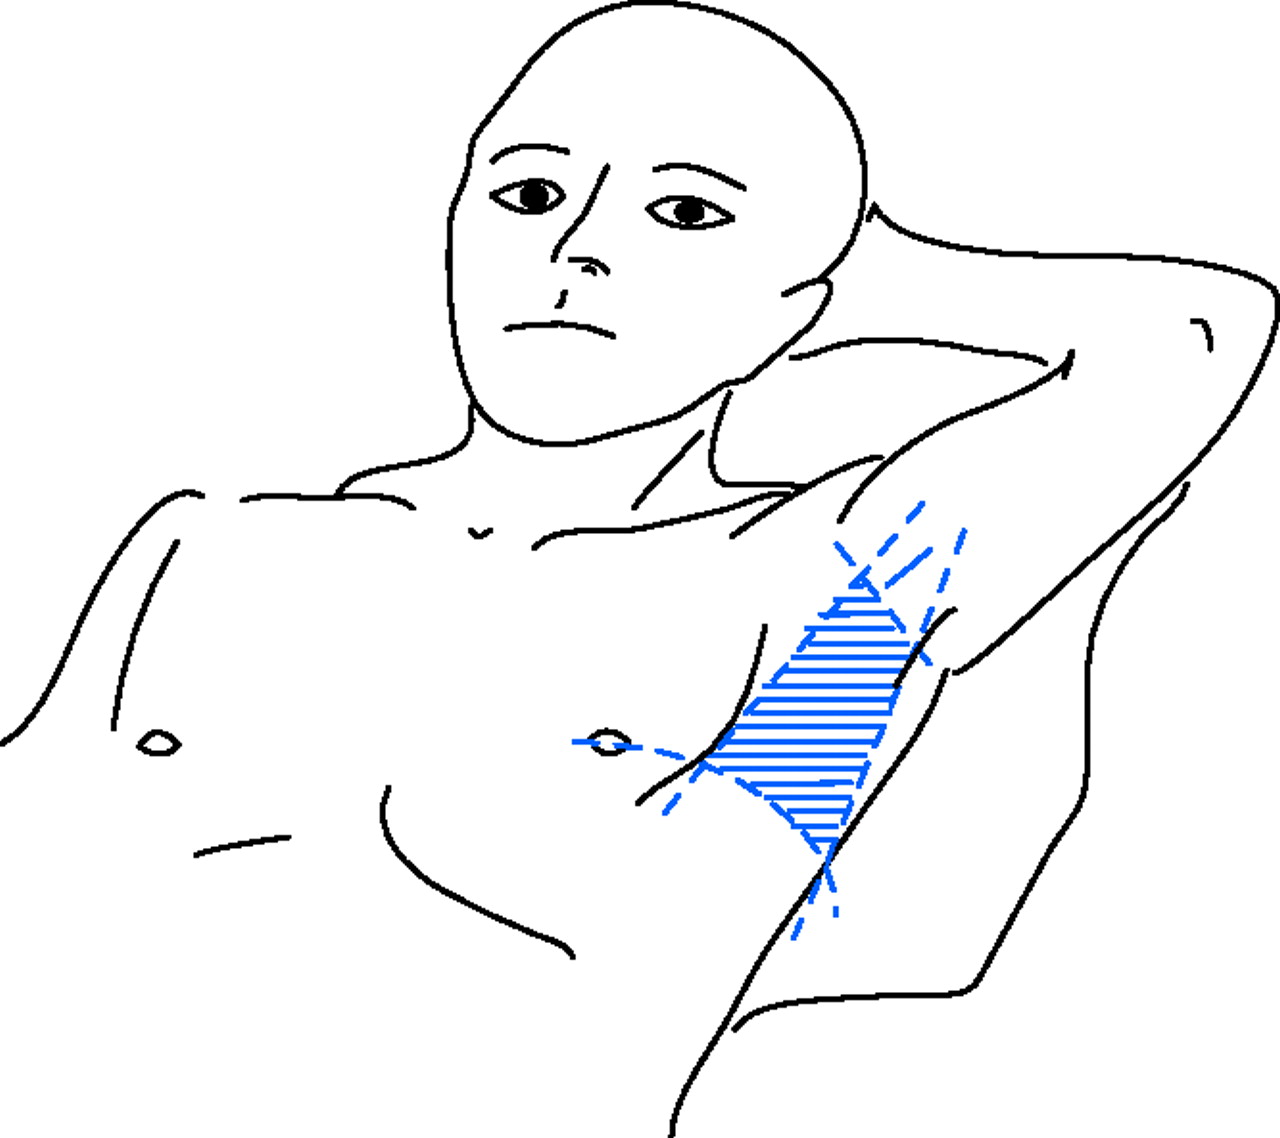
The ‘triangle of safety’. The triangle is bordered anteriorly by the lateral edge of pectoralis major, laterally by the lateral edge of latissimus dorsi, inferiorly by the line of the fifth intercostal space and superiorly by the base of the axilla.
The needle is inserted in the space just above a rib to avoid damaging the neurovascular bundle. It is common practice to insert the needle more posteriorly for a pleural aspiration, but it should be noted that the neurovascular bundle may not be covered by the lower flange of the rib in this position25 and a more lateral or anterior site of insertion is considered safer.
Equipment
Pleural aspiration should be aseptic and therefore sterile gloves, a sterile field, skin sterilising fluid and a clean dressing are needed.
For a simple diagnostic pleural aspiration a 21G (green) needle and a 50 ml syringe is sufficient to obtain a sample.
If aspiration of air or a larger sample of fluid is required (therapeutic tap), there are a number of commercially available kits to perform a pleural aspiration although it is often performed in the UK by adapting easily available equipment for the purpose. Most commonly this is an intravenous cannula attached to a three-way tap and tubing/syringe. The tip of the tubing can then be directed into a suitable receptacle for sampling or disposal, or an underwater seal if required.
Aseptic technique
Pleural aspiration should take place in a clean area using full aseptic technique. (✓)
Empyema is a serious and avoidable complication of pleural aspiration, the risk of which is greater with multiple attempts. It is recommended that strict asepsis should be employed, especially when carrying out therapeutic aspirations.
Size of needle
Pleural aspiration with large-bore needles should be avoided. (C)
The use of large-bore needles for pleural aspiration probably increases the risk of developing post-procedure pneumothorax. In addition, if a vascular or visceral injury does inadvertently occur, the use of a large-bore needle is likely to result in more damage than a small-bore needle.
Several studies have linked the use of larger bore needles to an increased rate of post-procedure pneumothorax, although needle size has not been the prime focus of any study. A large retrospective study and a small prospective study both demonstrated a significantly higher pneumothorax rate after pleural aspirations performed with needle sizes larger than 20G.19 20 However, a non-randomised prospective study of three different needle types which were different sizes found no difference in the post-procedure pneumothorax rate.10
Two other retrospective studies found an increased rate of post-procedure pneumothorax when using larger bore needles. However, both studies were confounded because the larger needles were used to aspirate larger volumes of pleural fluid which itself may increase the rate of complications.12 26
The choice of needle length may have to be adjusted in patients with thick thoracic walls. A CT-based study of 53 Scottish patients found that the depth to the pleura was >4.5 cm in the mid-hemithorax line in the second intercostal space in up to 13.2% and up to 47.2% in the mid-axillary line in the fifth intercostal space.27 This result needs to be interpreted with caution because the tissue thickness in the mid-axillary line will be increased in the supine position owing to soft tissue falling to the side by gravity. Additionally, the soft tissue is often compressible and so a standard needle may be adequate to reach the pleura even if the depth is >4.5 cm on CT imaging. Two studies have measured chest wall thickness on CT scans and found that a standard 40 mm long needle may not be adequate to reach the pleural space in the second intercostal space in some patients. One study was in American military personnel28 and the other was in a Canadian population.29
A reference for needle and chest drain sizes can be found in appendix 2 in the online supplement.
Technique
Thoracic ultrasound should be performed before undertaking pleural aspiration. In the case of a diagnostic pleural aspiration, a syringe attached to a green needle is inserted into the pleural space using the technique described below and 20–50 ml of fluid withdrawn and sent for investigations as discussed in the guideline on investigation of a pleural effusion. Local anaesthesia is not required for a simple procedure but should be considered if difficulty attaining the pleural space is likely (ie, with an inexperienced operator or if the patient has a thick chest wall). Skin cleansing and an aseptic technique should be used.
In the case of a therapeutic aspiration, local anaesthetic should be administered as described in the section on chest drains below. The pleural space should be aspirated with the needle used to administer the local anaesthetic and the depth of the pleural space can then be confirmed. The aspiration needle or cannula should then be advanced into the chest, aspirating continually until the pleura is breached and air or fluid are withdrawn, paying close attention to the depth of the pleural space. The cannula should then be attached to a three-way tap and fluid/air withdrawn into the syringe and expelled via the free port of the three-way tap. This may be into a bag or jug for fluid, or into air or a tube inserted into a bottle under water acting as a one-way seal to prevent air being entrained.
This process should be repeated and continued until the procedure is terminated. The cannula is then removed and a simple dressing applied.
Volume of removal, re-expansion pulmonary oedema and the use of pleural manometry
The procedure should be stopped when no more fluid or air can be aspirated, the patient develops symptoms of cough or chest discomfort or 1.5 l has been withdrawn. (C)
The maximum volume which can be aspirated is subject to debate as there is concern that re-expansion pulmonary oedema (RPO) may occur and that the frequency of post-procedure pneumothorax may increase if larger volumes of fluid are withdrawn.
The rate of RPO has been quoted as being anywhere between 0.2% and 14%. In more recent studies30–32 the incidence of clinical RPO is <1% but asymptomatic radiologically-apparent RPO may be slightly more frequent. It is unlikely to occur if <1 l is withdrawn, but it is less clear how cases at risk of RPO can be predicted at higher volumes.
The amount of fluid which may be safely removed at one time continues to be debated and in many studies up to 3 l has been safely aspirated. Aspiration of up to 6.5 l30 without complication has been described. Advice has generally been conservative because of the morbidity associated with RPO and a mortality rate quoted as high as 20%.33
In a retrospective study of 735 pleural aspirations, Josephson et al found that draining 1.8–2.2 l was associated with a threefold increase in the frequency of post-procedure pneumothoraces compared with draining 0.8–1.2 l. They also found that draining >2.3 l was associated with an almost sixfold increase, although this subset only consisted of 21 procedures.34 Similar findings were made in other retrospective studies,12 20 26 although another failed to show any difference.10
It is possible that the association between the volume of fluid drained and the increase in occurrence of post-procedure pneumothorax is due in part to underlying trapped lung. If a greater volume of fluid is drained, then an underlying trapped lung is more likely to be revealed. This mechanism of post-aspiration pneumothorax has been discussed previously in the section on complications.
Although the safe aspiration of much larger volumes has been documented, it is also clear that complications are uncommon when aspirating <1.5 l. This is therefore the recommended volume to be aspirated at one attempt.
If symptomatic RPO does occur, the mainstay of management should be close cardiovascular and respiratory monitoring and oxygen therapy which is sufficient in many cases.35 36 Continuous positive airways pressure (CPAP) has been used in a number of cases with success.37 38 If using CPAP, caution should be taken to avoid recurrent pneumothorax and potential tension pneumothorax if the RPO has occurred following the aspiration of a pneumothorax and there is no pleural drain in place. The use of diuretics30 39 and steroids39 have also been described, although there is little evidence to support it and some authors counsel against their use.36
Pleural manometry is a technique whereby the pleural pressure is measured by connecting a water-filled manometer or an electric transducer to the thoracocentesis catheter via a three-way tap. This enables the initial pleural pressure to be measured and at intervals throughout the thoracentesis. While the initial pressure does not predict the pathology of the fluid, the pressure is most negative in cases of trapped lung. It is proposed in the papers describing this procedure that thoracentesis should be terminated when the pleural pressure falls to less than −20 cm H2O as this could predict the risk of RPO, the value being based on animal models. While there have been no randomised controlled trials to confirm this, in the cases series described there were no cases of RPO by using this method with >6 l of fluid being removed.40
Pleural manometry is not currently in clinical practice in the UK, there are no comparative studies and there is no commercially-designed equipment specific for this procedure.
Follow-up
A chest x-ray after a simple pleural aspiration is not required unless air is withdrawn, the procedure is difficult, multiple attempts are required or the patient becomes symptomatic. (C)
It is current practice to request a chest x-ray after pleural aspiration to exclude a pneumothorax. In a study of 278 cases of pleural aspiration Petersen et al assessed the ability of physicians to detect significant post-aspiration pneumothoraces. Of the 15 patients in whom the physician suspected a post-procedure pneumothorax, nine were subsequently found to have a pneumothorax. In all nine, air was freely aspirated at the time of the procedure. Only 2.3–3.3% of the cases in which no pneumothorax was suspected were subsequently found to have one, and all of these cases used a vacuum bottle to aspirate the pleural effusion.41 Another study9 showed that, in 174 pleural aspirations, five out of eight of the pneumothoraces that occurred were expected and none of the unsuspected cases required intervention. Two of the five cases with pneumothorax had had multiple procedures.9 Capizzi et al found that pneumothorax was present in five of 54 chest x-rays performed after pleural aspiration for fluid as outpatients and no symptomatic complications were found in a further 50 cases who did not have a chest x-ray.42
We conclude that the physician performing an aspiration can usually predict the presence or absence of a clinically significant post-procedure pneumothorax and therefore a post-aspiration chest x-ray is not routinely needed. The use of vacuum bottles during aspiration can hinder the operator's ability to detect inadvertently aspirated air.
Insertion of chest drains
A chest drain is a tube which is placed in the pleural space to drain its contents (fluid or air) and remains in place until drainage is complete.
Indications
The indications for chest drain insertion are shown in box 2.
Box 2 Indications for chest drain insertion
Pneumothorax*
In any ventilated patient
Tension pneumothorax after initial needle relief
Persistent or recurrent pneumothorax after simple aspiration
Large secondary spontaneous pneumothorax in patients aged >50 years
Malignant pleural effusions ± pleurodesis*
Empyema and complicated parapneumonic pleural effusion*
Traumatic haemopneumothorax
Post-surgical (eg, thoracotomy, oesophagectomy, cardiac surgery)
* Refer to specific guidelines for further detail.
Consent
Written consent should be obtained for chest drain insertions, except in emergency situations.
The General Medical Council (GMC) guideline43 ‘Consent: Patients and Doctors Making Decisions Together’ states that it is the responsibility of the doctor carrying out a procedure or an appropriately trained individual with sufficient knowledge of a procedure to explain its nature and the risks associated with it in a language which is understandable to the patient. It is within the rights of a competent individual patient to refuse such treatment, and patients without mental capacity should be treated following the appropriate advice given in the GMC guidance. As insertion of a chest drain is a procedure associated with significant risk, consent should be obtained in writing and should include the commonest and most serious complications as outlined below and also the possibility of treatment failure. In the case of an emergency when the patient is unconscious and the treatment is lifesaving, treatment may be carried out but must be explained as soon as the patient is sufficiently recovered to understand. An information leaflet should be given where available prior to the procedure (see appendix 3 in online supplement).
Complications
Pain, intrapleural infection, wound infection, drain dislodgement and drain blockage are the most frequent complications of small-bore chest drain insertion. Visceral injury is the most serious complication. All of these possible sequelae should be detailed in the consent process. (✓)
Pain, intrapleural infection, wound infection, drain-related visceral injury and drain blockage are the most frequent complications of large-bore chest drain insertion. All of these possible sequelae should be detailed in the consent process. (✓)
Numerous case reports have described a range of serious complications associated with chest drains including visceral puncture and serious bleeding, which fortunately are rare. There are also reports of nerve damage to both the intercostal nerves during insertion and nerve bundles within the thoracic cavity from the drain itself (Horner's syndrome being one of the more commonly recorded), but these also seem to be sporadic cases. A survey of UK NHS Trusts found that the majority of them had experienced a major complication following a chest drain insertion between 2003 and 2008. There were 17 fatalities reported during this time which were mainly due to misplaced drains.2 Complications have been reported to be highest in large-bore chest drains inserted in trauma patients using the trocar technique. The lowest reported complication rates are seen in studies where small drains are inserted by consultant radiologists. It is likely that complications are reduced by using ultrasound guidance and this has been recommended by the NPSA.1
The most commonly occurring complications in the studies examined are shown in tables 2 and 3. Pneumothorax is also commonly reported, but the aetiology is multifactorial ranging from lung injury and introduction of air to ‘trapped lung’, which is not regarded as a procedural complication (see section on pleural aspiration). Simple pneumothoraces are easily dealt with by the chest drain itself and, where possible, we have reported lung injury under the ‘injury’ column in tables 2 and 3. Liu et al44 studied pneumothorax treatment and reported three cases of haemothorax as a complication; these are also reported in the ‘injury’ column.
Frequency of post-insertion complications for small drains (≤16 F)
Frequency of post-insertion complications for large-bore drains (≥20 F or stated ‘large-bore drain’)
Tables 2 and 3 are separated into small-bore drains and large-bore drains for ease of reference, although they cannot be directly compared owing to significant differences in the insertion technique, the use of image guidance and the indications for the drains to be inserted. These differences are described in more detail in the table in appendix 4 in the online supplement. There is also a range of operator experience in the studies with a tendency for small-bore image-guided drains to be inserted by more senior operators; these factors are likely to explain the different malposition rates for the two types of drain.
Antibiotic prophylaxis
Antibiotic prophylaxis is not recommended for non-trauma patients requiring a chest drain. (✓)
Antibiotic prophylaxis should be considered for trauma patients requiring chest drains, especially after penetrating trauma. (A)
The rate of empyema and wound infection in trauma cases has been reported to be as high as 5.8–13%. A number of studies,62–68 including a meta-analysis69 70 of 507 cases of thoracic trauma requiring chest drainage comparing empirical antibiotics with placebo, showed an absolute reduction in infection and empyema in the treatment group of 5.5% (OR 5.27 in favour of giving antibiotics). It should be noted, however, that these studies were of different types of thoracic trauma (blunt and penetrating) and occurred in predominantly young male patients in a variety of settings. In addition, the environment in which the chest drain was inserted may not have been fully aseptic in some cases. The antibiotics used have varied from study to study, but all have shown a reduction in the infection rates. The studies are summarised in the evidence table which is available on the BTS website at www.brit-thoracic.org.uk.
The use of antibiotic prophylaxis in medically inserted chest drains has not been studied but, given the low rates of infection and the risk of hospital-acquired infections such as Clostridium difficile and the older age group of these patients, it cannot be recommended at this time.
Equipment
The equipment required is shown in box 3.
Box 3 Equipment
Sterile gloves and gown
Skin antiseptic solution (eg, iodine or chlorhexidine in alcohol)
Sterile drapes
Gauze swabs
A selection of syringes and needles (21–25 gauge)
Local anaesthetic (eg, lidocaine 1%)
Scalpel and blade
Suture (eg, 0 or 1-0 silk)
Instrument for blunt dissection if required (eg, curved clamp)
Guide wire and dilators for Seldinger technique
Chest tube
Connecting tubing
Closed drainage system (including sterile water if underwater seal being used)
Dressing
Equipment may also be available in kit form.
Size of drain
Small drains should be used as first-line therapy for pneumothorax, free flowing pleural effusions and pleural infection. (C)
Traditionally, large-bore drains were recommended and inserted using a blunt dissection technique. With the increased availability of small drains and use of the Seldinger technique this has now become the most common mode of chest drain insertion, such that many trainee doctors are not able to insert large-bore drains except emergency doctors or surgeons who have undergone ATLS training.
Small-bore chest drains have a low risk of serious complications, as demonstrated in table 2. Small-bore catheters have significantly lower pain scores and analgesia requirements and a greater degree of comfort than in comparable patients in whom large-bore catheters have been inserted for the same indication.71 72 Davies et al described high overall complication rates (42%) with small-bore drains, but the majority of these were dislodgement (21%), blockage (9%) or pain (5%).51 Collop et al also described a higher complication rate with small-bore drains (36%) than with large-bore drains (9%). In this study, however, the small-bore drain group was substantially smaller (11 patients vs 115 patients) and the complications were less severe (malposition, blockage and kinking in the small-bore drain group versus one episode of possible lung laceration and a site infection as well as others in the large-bore drain group).52
The relatively low risk of complications with small-bore drains inserted using the Seldinger technique is generally accepted, but there is greater debate regarding the effectiveness of small-bore drains in various clinical situations.
One of the arguments put forward for using larger drains is the greater flow that is possible as predicted by Poiseuille's law. However, the maximum rate of drainage possible through a drain is unlikely to be important when draining a pleural effusion when the rate of flow is usually deliberately controlled.
Rate of flow may theoretically be more of an issue when draining pneumothoraces with a persistent high volume air leak. This theoretical advantage is not borne out in the majority of clinical cases of pneumothorax where the use of smaller drains (≤14 F)44–46 48 50 73 had similar rates of success for draining pneumothoraces as the larger drains.44 45 61 Liu et al compared conventional chest tubes with small bore (8–10 F) drains for the management of spontaneous pneumothorax in a retrospective review of a change in their practice and found the success rates to be comparable. Of the 15 patients in their small-bore drain group who needed further management, all went on to receive a conventional chest tube; 4 (27%) resolved with this management and 11 (73%) subsequently needed surgery.44 Other small retrospective studies comparing large and small drains have shown them to be equivalent in the acute management of primary spontaneous pneumothorax. One suggested that there is a higher rate of recurrence associated with the use of small-bore drains,74 although this has not been borne out in other studies.44 75
Small-bore chest drains inserted by the Seldinger technique are therefore recommended as first-line therapy for spontaneous pneumothoraces and iatrogenic pneumothoraces; however, a larger bore drain may be needed in cases of very large air leaks, especially postoperatively.
Drainage of simple pleural effusions is also effectively done with a small-bore drain.45–49 61 It is likely that the limiting factor when using a small-bore chest drain is the connecting of a two- or three-way tap as this has a narrower bore than the drain.76
Parulekar et al and Clementsen et al compared small-bore and large-bore drains when draining malignant pleural effusions and performing sclerotherapy.71 77 They found no difference between the two groups with regard to time taken to drain the effusion prior to sclerotherapy or the effectiveness of the sclerotherapy. Clementsen et al also showed that the small-bore drain group found the experience of drain insertion and the presence of the drain a less unpleasant experience than those in the large-bore drain group.71
We recommend that small-bore drains are the first choice for draining pleural effusions.
The use of small-bore drains to drain empyemas has a very variable success rate across studies.45–47 78–81 The most common problem is drain blockage 45 46 and drain dislodgement.51 It is likely that the limiting factor when using a small-bore chest drain is the connecting of a two- or three-way tap as this often has a narrower bore than the drain.76 Davies et al suggest that regular flushing reduces the rate of drain blockage51 and studies that employed regular flushing of the drains with either saline or a fibrinolytic drug have higher therapeutic success rates.78–81
We therefore recommend that image-guided small-bore drains should be used as first-line therapy for the treatment of empyema. Regular flushing is probably helpful but needs further investigation. More than one drain may be needed to achieve successful drainage. Subsequent drains may be necessary to drain separate loculations or to replace drains that have become blocked.46 79 80
Large-bore drains may be helpful if small-bore drainage fails but, equally, image-guided small-bore drainage can be therapeutically successful when large-bore drainage fails.80 82 83
Analgesia and sedation
To reduce pain associated with chest drains, analgesia should be considered as premedication and should be prescribed for all patients with a chest drain in place. (✓)
If formal sedation is used during the procedure, this should be given in line with the recommendation of the Academy of Royal Colleges for conscious sedation and include oximetry recording throughout the procedure. (✓)
Chest drain insertion has been reported to be a painful procedure with 50% of patients experiencing pain levels of 9–10 on a scale of 10 in one study4 and therefore premedication should be considered. Despite the apparent common sense of this approach, there is little established evidence of the effect from these medications and there are concerns for the safety of this approach in operators unfamiliar with safe sedation techniques. The Royal College of Anaesthetists in association with the Academy of Royal Colleges issued guidance for conscious sedation, and doctors should be familiar with these guidelines before employing this technique.84
Premedication could be with an intravenous anxiolytic (eg, midazolam 1–2 mg titrated to achieve adequate sedation) or an analgesic (eg, 2.5 mg intravenous morphine given immediately prior to the procedure or 10 mg oromorph 1 h prior to the procedure). No single technique has been shown to be clearly superior. Both these classes of drugs may cause respiratory depression and all patients who receive them should be observed. Patients with chronic obstructive pulmonary disease are particularly at risk and require extra care when using these drugs. Reversal agents (eg, naloxone or flumazenil) are occasionally necessary and should always be immediately accessible if using intravenous opiates or benzodiazepines. Intravenous access should be maintained throughout the procedure and oxygen saturation should be monitored continuously. Sedation should allow the patient to remain conversant throughout the procedure and should be combined with a sensitive explanation during the procedure with reassurance.
While the use of atropine as part of premedication for fibreoptic bronchoscopy has been assessed, no controlled trials of its use in chest tube insertion were found although it is advocated in some centres. Case reports of vasovagal reactions and a death due to vagal stimulation following tube insertion may support its use as premedication.
Patient position and site of insertion
The preferred position for standard drain insertion is on the bed, slightly rotated, with the arm on the side of the lesion behind the patient's head (figure 3A) or on the hips to expose the axillary area or in the lateral decubitus position (figure 3C). An alternative is for the patient to sit upright leaning over an adjacent table with a pillow under the arms (figure 3B).

Common patient positions for chest drain insertion. (A) Semi-reclined with hand behind head. (B) Sitting up leaning over a table with padding. (C) Lateral decubitus position.
Insertion should be in the ‘triangle of safety’ illustrated in figure 2. This is the area bordered by the lateral edge of the latissimus dorsi, the lateral border of the pectoralis major muscle and superior to the horizontal level of the fifth intercostal space. This position minimises the risk to underlying structures (eg, internal mammary artery) and avoids damage to muscle and breast tissue resulting in unsightly scarring.
For apical pneumothoraces the second intercostal space in the mid-clavicular line is sometimes chosen but is not recommended routinely. This position may be uncomfortable for the patient and is more visible if the drain insertion leaves an unsightly scar. It may be the preferred site when using a small drain with an ambulatory drainage system. Loculated apical pneumothoraces are not uncommonly seen following thoracotomy and may be drained using a posteriorly (suprascapular)-sited apical tube. This technique should, however, be performed under image guidance or by an operator experienced in this technique such as a thoracic surgeon. If the drain is to be inserted into a loculated pleural collection, the position of insertion will be dictated by the site of the locule as determined by imaging.
Confirming site of insertion
During chest drain insertion an attempt to aspirate the pleural contents with a small needle should be made. If this is not possible, chest drain insertion should not continue. (✓)
Immediately before the procedure the identity of the patient should be checked and the site and side for insertion of the chest tube confirmed by reviewing the clinical signs and the chest x-ray. Once a safe site for chest drain insertion has been identified and prior to the insertion of a drain, the expected pleural contents (air or fluid) should be aspirated with a small needle, usually while administering local anaesthesia. If none is forthcoming, further imaging is required.
Image guidance
It is strongly recommended that all chest drains for fluid should be inserted under image guidance. (B)
There is less evidence comparing ultrasound guidance against clinical guidance for chest drain insertion than there is for pleural aspiration. Intuitively, the use of thoracic ultrasound should reduce the risk of drain malposition and complications as the data regarding accuracy of site selection, as described in the pleural aspiration section, is as relevant for chest drain insertion as it is for pleural aspiration.
Several studies have successfully used ultrasound-guided small-bore chest drains in the treatment of pneumothorax,46 73 pleural infection46 47 78–80 and pleural effusion46 47 with high levels of efficacy and low complication rates. However, it is difficult to determine the exact contribution of ultrasound as these studies often used mixed modality imaging including CT and fluoroscopy.
Ultrasound is useful in guiding the insertion of a chest drain into free-flowing pleural effusions. Keeling47 demonstrated that, in a subgroup of 30 patients, image-guided chest drains were 100% successful in treating simple non-infected pleural effusions. The majority of drains were inserted using ultrasound guidance. However, in one patient the chest drain was incorrectly sited within the subcutaneous tissue and was correctly re-sited using CT guidance. There were no serious complications.
Several studies have shown that image-guided small drains are effective in the management of pleural infections, particularly when the effusions are loculated. No studies were found that directly compared image-guided drainage with other methods of treatment such as non-image guided small-bore or large-bore drainage. Moulton et al,79 Keeling et al,47 Cantin et al,85 Silverman et al80 and Akhan et al78 have all used ultrasound guidance to direct small-bore drains for the treatment of pleural infection with a success rate of 73–94%. Ultrasound can be used to direct chest drains into the largest loculation or into two or more separate collections when treating multiloculated effusions with good effect. CT should be used if the abnormalities are poorly visualised on ultrasound.80 Van Sonnenberg et al83 used the greater positional accuracy of image-guided small-bore catheters to successfully treat patients with empyema who had failed management with conventional chest tube drainage. Of the 17 catheters included in the study, 13 were inserted following failure of standard chest tube therapy (of these, 10 were in the wrong position and 2 were in small locules). Overall, image-guided small-bore drains were successful in 13 of the cases (76.5%).
Thoracic ultrasound is of limited utility in guiding insertion of a chest drain in the presence of a pneumothorax because of the difficulty in obtaining useful images due to the poor transmission of sound waves through air.
Aseptic technique
Chest drains should be inserted in a clean area using full aseptic technique including gowns, drapes, sterile gloves and skin cleansing. (C)
Although this is uncommon, estimations of the empyema rate following drain insertions are approximately 0.2–2.4% (tables 2 and 3) for medically inserted chest drains in formal studies but may be higher in routine practice. This may be because, in published studies looking at complication rates, the drains were inserted in dedicated areas in emergency rooms or theatres with full aseptic technique being employed.
Infection following chest drain insertion, both cutaneously and within the pleural space, is an avoidable complication of the procedure and we therefore recommend that full aseptic technique including sterile gloves, drapes and gowns is used.
We also recommend that chest drains are inserted in a clean area away from sources of contamination and with enough space so that the sterile field can be preserved. This should be separate from a general ward area.
Local anaesthesia
Lidocaine 1% should be infiltrated prior to the procedure, paying particular attention to the skin, periostium and the pleura. (✓)
Chest drain insertion is described as a very painful procedure by patients and can be improved by better training, use of sedation (see above) and liberal use of local anaesthesia. In centres which undertake medical thoracoscopy, it is recognised that this can be a relatively painless procedure and it is therefore likely that a similar technique applied to chest drain insertion will be successful although there is no evidence to confirm this.
Expert opinion is that local anaesthetic is infiltrated into the site of insertion of the drain. A small-gauge needle is used to raise a dermal bleb before deeper infiltration of the intercostal muscles and pleural surface. As the skin, the pleura and periostium are the most sensitive areas, this is where most of the anaesthesia should be infiltrated. A spinal needle may be required in the presence of a thick chest wall, but image guidance is strongly recommended if the pleura cannot be breached by a green needle to ensure localisation of the correct site.
Local anaesthetic such as lidocaine (up to 3 mg/kg) is usually infiltrated. Higher doses may result in toxic levels. The peak concentration of lidocaine was found to be <3 μg/ml (ie, low risk of neurotoxic effects) in 85% of patients given 3 mg/kg intrapleural lidocaine. The volume given is considered to be more important than the dose to aid spread of the effective anaesthetic area and therefore a dilute preparation (1% rather than 2%) is preferable. The use of epinephrine to aid haemostasis and localise the anaesthesia is used in some centres but has not been studied in this context. The use of epinephrine allows up to 5 mg/kg lidocaine to be infiltrated.
Insertion technique
Drains should never be inserted using substantial force. (✓)
The dilator should not be inserted further than 1 cm beyond the depth from the skin to the pleural space. (✓)
Blunt dissection should be employed in cases of trauma or insertion of large-bore drains. (C)
Small-bore Seldinger technique
The Seldinger technique to insert a chest tube has become the most widespread method of drain insertion since the publication of the previous guidelines in 2003. In many centres it is the only method of drain insertion on medical wards and many doctors have never been trained to insert a drain any other way. When this technique was introduced it was thought it would be an easier and safer way to insert a drain based mainly on the initial experience by radiologists inserting under ultrasound guidance. The technique can be carried out safely by other doctors as long as they are appropriately trained and familiar with the equipment used in their hospital.
A needle is introduced into the pleural space and the pleural contents should be aspirated at this stage to confirm the position of the needle tip in the pleural space. The depth of the needle when it enters the pleural space is noted. A guide wire is passed through the needle which can be used to gently guide the wire to the apex or the base of the pleural cavity as required. The needle is then withdrawn leaving the guide wire in place and a small skin incision is made. The dilator is then passed gently over the guide wire using a slight twisting action. Many of the reported injuries as a result of chest drain insertion were due to visceral puncture by the dilator. Force is unnecessary and the dilator only needs to be passed 1 cm beyond the depth to the pleura as measured with the introducer needle. By holding the dilator firmly at this depth or using a marker available with some kits, excessive insertion depth can be avoided.
The tract is further widened by using a series of enlarging dilators up to the size of the drain. The drain is then inserted gently over the wire aiming upwards for pneumothorax or as appropriate for the fluid to be drained. The depth should be enough to ensure the last drainage hole is well within the pleural space (approximately 5–10 cm) but does not require insertion to the hilt. The guide wire is then removed leaving the drain in place. The drain should be stoppered until secured and then connected to a drainage system.
Large-bore blunt dissection
Surgically inserted chest drains should be inserted by blunt dissection. Trocars should not be used. (C)
Once the anaesthetic has taken effect, an incision is made just above and parallel to a rib. This should be slightly bigger than the operator's finger and tube.
Many cases of damage to essential intrathoracic structures have been described following the use of trocars to insert large-bore chest tubes. The use of a trocar to guide a chest drain insertion is associated with the highest complication rates58 and, in a recent study of malpositioned chest tubes, all had been inserted by the trocar technique.86 A trocar should therefore never be used.
Blunt dissection of the subcutaneous tissue and muscle into the pleural cavity has therefore become universal and is essential. In one retrospective study87 only four technical complications were seen in 447 cases using blunt dissection. Using a Spencer–Wells clamp or similar, a path is made through the chest wall by opening the clamp to separate the muscle fibres. For a large chest drain (>24 F), this track should be explored with a finger through into the thoracic cavity to ensure there are no underlying organs that might then be damaged at tube insertion. This is essential in the case of thoracic trauma where displacement of internal organs may make insertion of the drain particularly hazardous. Excessive force should never be required during drain insertion.
Sutures and securing the drain
A common complication of drain insertion is accidental removal of the drain, usually as a result of inadequate securing techniques.
The drain itself should be secured after insertion to prevent it falling out. Various techniques have been described but a simple technique of anchoring the tube has not been the subject of a controlled trial. The chosen suture should be stout and non-absorbable (eg,’0’ or ‘1-0’ silk) to prevent breaking and it should include adequate skin and subcutaneous tissue to ensure it is secure. Commercially available dressings may also be used which fix to the skin and then attach to the drain. It should be emphasised that, while these dressings are useful for stabilising the drain at the skin and preventing kinking at the skin surface, they do not replace the need to stitch the drain firmly in place.
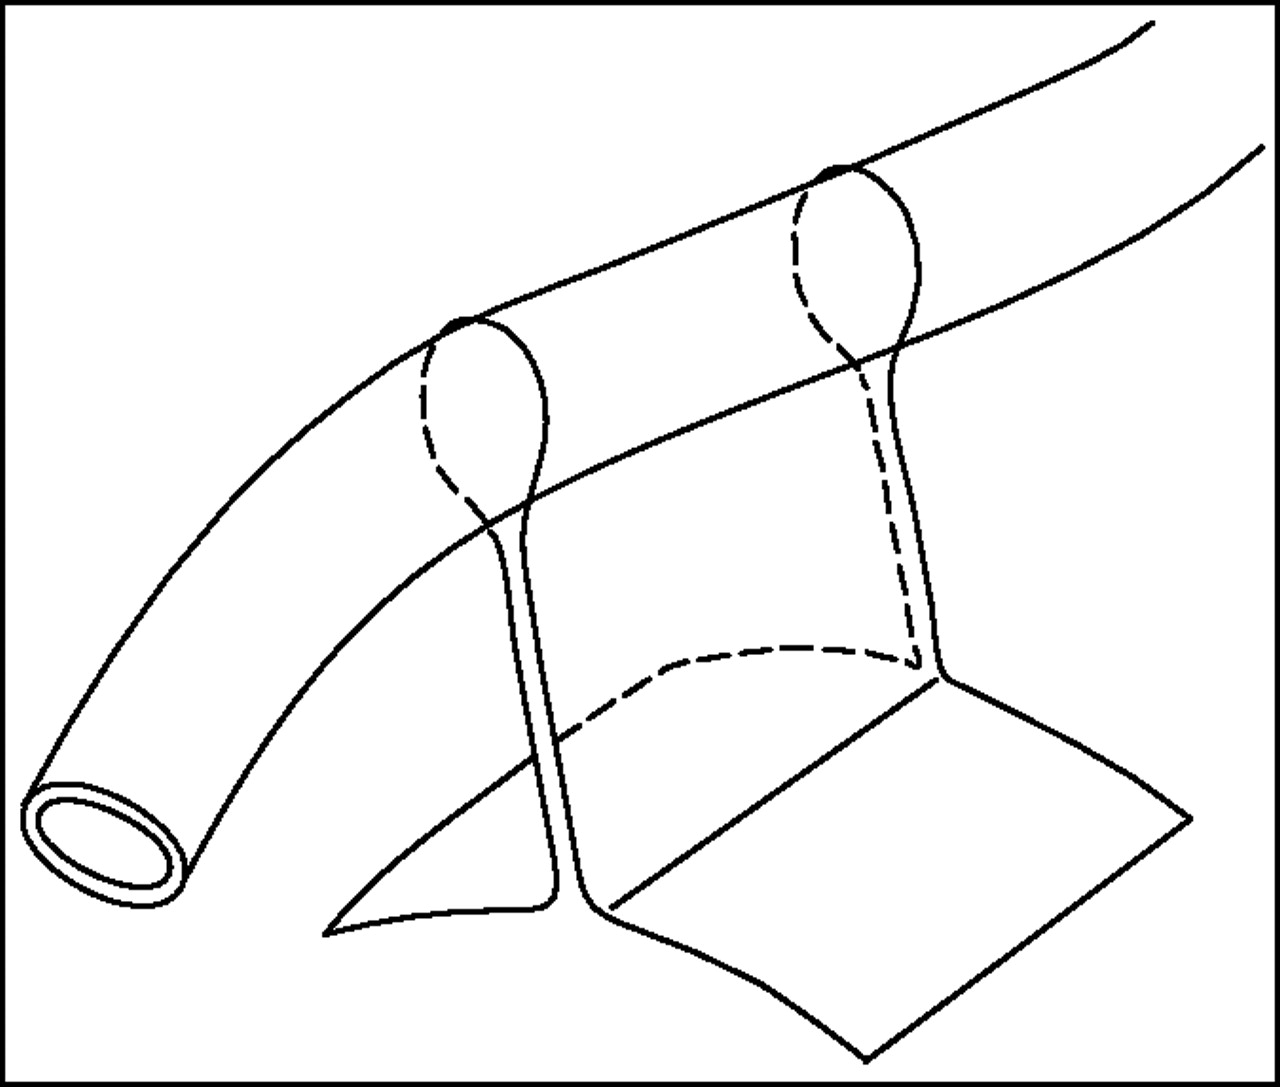
Large amounts of tape and padding to dress the site are unnecessary and concerns have been expressed that they may restrict chest wall movement or increase moisture collection. A transparent dressing allows the wound site to be inspected by nursing staff for leakage or infection. An omental tag of tape has been described which allows the tube to lie a little away from the chest wall to prevent tube kinking and tension at the insertion site (figure 4).

The omental tape technique.
In the case of a large-bore drain, a suture for wound closure should be placed at the time of the drain insertion. A ‘mattress’ suture or sutures across the incision are usually employed and, whatever closure is used, the stitch must be of a type that is appropriate for a linear incision. Complicated ‘purse-string’ sutures must not be used as they convert a linear wound into a circular one that is painful for the patient and may leave an unsightly scar. A suture to close the wound is not usually required for small-gauge chest tubes.
Drain position
If malposition of a chest drain is suspected a CT scan is the best method to exclude or confirm its presence. (C)
A chest drain may be withdrawn to correct a malposition but should never be pushed further in due to the risk of infection. (✓)
A further drain should never be inserted through the same hole as a previously dislodged drain as this can introduce infection. (✓)
If possible, the tip of the tube should be aimed apically to drain air and basally for fluid. However, successful drainage can still be achieved when the drain is not placed in an ideal position and therefore effectively functioning tubes should not be repositioned simply because of a suboptimal radiographic appearance.
In the case of a drain which fails despite an apparent acceptable position on the plain chest x-ray, a CT scan may be performed and demonstrate the cause. A chest tube may be intraparenchymal or extrapleural and the chest x-ray may give no indication of its malposition.55 56 88
Drainage systems
A chest drain should be connected to a drainage system that contains a valve mechanism to prevent fluid or air from entering the pleural cavity. This may be an underwater seal, flutter valve or other recognised mechanism. (✓)
A number of drainage systems are available. The most common is the underwater seal bottle although flutter bags and Heimlich valves have been successfully used to achieve ambulatory drainage and numerous other examples have been described. All drainage systems allow only one direction of flow.
The closed underwater seal bottle is a system in which a tube is placed under water at a depth of approximately 3 cm with a side vent with allows escape of air or may be connected to a suction pump. This enables the operator to see air bubble out as the lung re-expands in the case of pneumothorax or fluid evacuation rate in empyemas, pleural effusions or haemothorax. The continuation of bubbling suggests a continued visceral pleural air leak, although it may also occur in patients on suction when the drain is partly out of the thorax and one of the tube holes is open to the air. The inspiratory swing in the tube is useful for assessing tube patency and confirms the position of the tube in the pleural cavity. The disadvantages of the underwater seal system include the obligatory inpatient management, difficulty of patient mobilisation and the risk of knocking the bottle over.
The use of integral Heimlich flutter valves has been advocated in the case of pneumothoraces, especially as they permit ambulatory or even outpatient management which has been associated with a success rate of 85–95%. In 176 cases of pneumothorax treated with small chest tubes and a Heimlich flutter valve there were only eight failures (hospital admissions for problems with tube function or placement).89 The average length of inpatient stay has been quoted as 5 h with a thoracic vent and 144 h with an underwater seal, with a cost saving of US$5660.90 Case reports of incorrect use (wrong direction of flow) of such valves have been described, however, with tension pneumothorax as a result. Flutter valves cannot be used with fluid drainage as they tend to become blocked. However, in the UK a similar short hospital stay is achieved by initial aspiration of pneumothoraces (see pneumothorax guidelines).
The use of a drainage bag with an incorporated flutter valve and vented outlet has been successfully used postoperatively but has also been used successfully in clinical practice. In the case of malignant pleural effusion drainage, a closed system using a drainage bag or aspiration via a three-way tap has been described to aid palliation and outpatient management. The more recent development of indwelling tunnelled pleural catheters is likely to replace this.
Management of a chest drain
All patients with chest drains should be cared for by a medical or surgical team experienced with their management and nursed on a ward familiar with their care. (✓)
Rate of fluid drainage and clamping the drain
A bubbling chest tube should never be clamped. (C)
A maximum of 1.5 l should be drained in the first hour after insertion of the drain. (C)
Drainage of a large pleural effusion should be controlled to prevent the potential complication of re-expansion pulmonary oedema. (C)
Clamping a chest drain in the presence of a continuing air leak may occasionally lead to the potentially fatal complication of a tension pneumothorax. A bubbling drain should therefore never be clamped.
It is felt that a general rule not to clamp a drain is the safe approach in most instances to avoid clamping being carried out inappropriately by less experienced clinicians. However, many experienced physicians support the use of clamping of chest drains prior to their removal to detect small air leaks not immediately obvious at the bedside. By clamping the chest drain for several hours followed by a chest x-ray, a recurrence of a pneumothorax may be ruled out. Such a strategy, though not generally recommended, may be acceptable for experienced specialists. The clamped drain should be closely supervised by nursing staff who are familiar with the management of chest drains and who should unclamp the chest drain in the event of any clinical deterioration.
In the case of pleural effusions, the volume of fluid drained in the first hour should be a maximum of 1.5 l. After an hour the rest of the fluid may be drained off slowly. The fluid volume should be controlled in this fashion to avoid the risk of RPO (see earlier).
Suction
There is no evidence to recommend or discourage the use of suction in a medical scenario, however it is common practice especially in the treatment of non-resolving pneumothoraces. In trauma and postoperative patients, suction has been shown not to improve pneumothorax resolution times or chest drain duration91 92 and, in some cases, may potentially be detrimental.93 94 It is difficult, however, to extrapolate this evidence to the medical use of chest drains. One study did include patients with spontaneous pneumothorax and again found that the use of suction did not alter treatment outcome, but the number of patients was small.95
If suction is required, this may be done by the underwater seal at a level of 10–20 cm H2O. A high-volume low-pressure system (eg, Vernon-Thompson) is required to cope with a large leak. A low-volume high-pressure pump (eg, Roberts pump) is inappropriate as it is unable to cope with the rapid flow, thereby effecting a situation similar to clamping and risking formation of a tension pneumothorax. A wall suction adaptor may also be effective, although chest drains must be connected to a specialised thoracic suction regulator and not directly to the high negative pressure regulators that are used for other purposes.
Nursing care of a chest drain
Chest drains should be managed on wards familiar with chest drains and their management. (✓)
Drains should be checked daily for wound infection, fluid drainage volumes and documentation for swinging and/or bubbling. (✓)
Patients should be managed on a ward familiar with chest tubes. The appropriate training of the nursing staff is imperative and communication between the medical and nursing staff regarding the chest drain care is vital. If an underwater seal is used, instructions must be given to keep the bottle below the insertion site at all times, to ensure that it is kept upright and that there is adequate water in the system to cover the end of the tube. Daily reassessment of the amount of drainage/bubbling and the presence of respiratory swing should be documented preferably on a dedicated chest drain chart. Instructions with regard to chest drain clamping must be given and recorded.
Patients should be encouraged to take responsibility for their chest tube and drainage system. They should be taught to keep the underwater seal bottle below the level of their chest and to report any problems such as pulling on the drain insertion site. Educational material (eg, leaflets) should be available on the ward for patients and nursing staff.
Removal of drain
The chest tube should be removed once the fluid drainage has decreased to less than 200 ml per day, resolution of the pneumothorax (see specific guidelines) or when the drain is no longer functioning. Removal is with a brisk firm movement while an assistant ties the previously placed mattress suture. In a study comparing removal in inspiration or expiration with a Valsalva manoeuvre, there was no difference in the immediate or short-term rate of pneumothorax.96
In the case of pneumothorax, the drain should not usually be removed until bubbling has ceased in the presence of evidence of tube patency and chest x-ray demonstration of re-inflation. Clamping of the drain prior to removal is generally unnecessary. When considering removal of a drain under suction, in trauma patients, a period of water seal only drainage prior to removal probably reduces the rate of recurrence of significant pneumothorax after removal97 although the results of a smaller study dispute this.98 There are no studies to guide medical practice, although it is common practice to allow a period of water seal only drainage after suction and before the drain is removed to check that a pneumothorax does not recur off suction.
Thoracic ultrasound
Ultrasound physics
Medical ultrasound uses sound waves between 2.5 and 12 MHz generated by a transducer to interrogate tissue. The sound waves are attenuated as they travel through tissue. Some or all of these waves are reflected at the interface between tissues where a difference between tissue impedance exists. The returning waves are detected by the transducer and converted into an image.
An understanding of the physical laws governing the transmission of sound waves in solids and fluids will facilitate an understanding of the acquired image and optimisation of the scanning technique.
Fluid is an excellent conductor of sound waves and appears black on ultrasound whereas air effectively blocks all transmission of sound waves and generates a random snowstorm image. Internal organs such as the liver or spleen have variable echogenicity depending on the proportion of sound waves reflected by the structure.
The maximal depth and resolution of an ultrasound image is related to the frequency of the sound waves. Lower frequencies have longer wavelengths and hence better tissue penetration but lower resolution. Higher frequencies have shorter wavelengths which provide higher resolution images and at a greater refresh rate but poor tissue penetration.
Normal thoracic ultrasound appearance
Ultrasound examination of the thorax is limited by air within the lungs, which is a poor conductor of sound waves, and the acoustic shadow caused by the bony structures surrounding the thorax such as the ribs and scapulae. However, the concept of an acoustic window99 has allowed for effective ultrasound examination of the thorax in the presence of pleural pathology such as a pleural effusion or pulmonary consolidation or tumour abutting the pleura.
The normal thoracic ultrasound appearance is well described.100–104 With the transducer held in the longitudinal plane, the ribs are visualised on ultrasound as repeating curvilinear structures with a posterior acoustic shadow (figure 5). The overlying muscle and fascia are represented by linear shadows of soft tissue echogenicity. The parietal and visceral pleura is usually visualised as a single echogenic line no more than 2 mm in width which ‘slides’ or ‘glides’ beneath the ribs with respiration when using a low-frequency transducer. Two separate lines can be visualised when using a high-frequency transducer. Normal aerated lung blocks the progression of sound waves and is characterised by a haphazard snowstorm appearance caused by reverberation artefact which diminishes in intensity with distance from the transducer. Comet-tail artefacts can also be seen due to imperfections within the pleura and are best seen at the lung bases. The diaphragms are bright curvilinear structures which move up and down with respiration. The liver and spleen are readily recognised by their characteristic ultrasound appearance below the right and left hemidiaphragm, respectively.
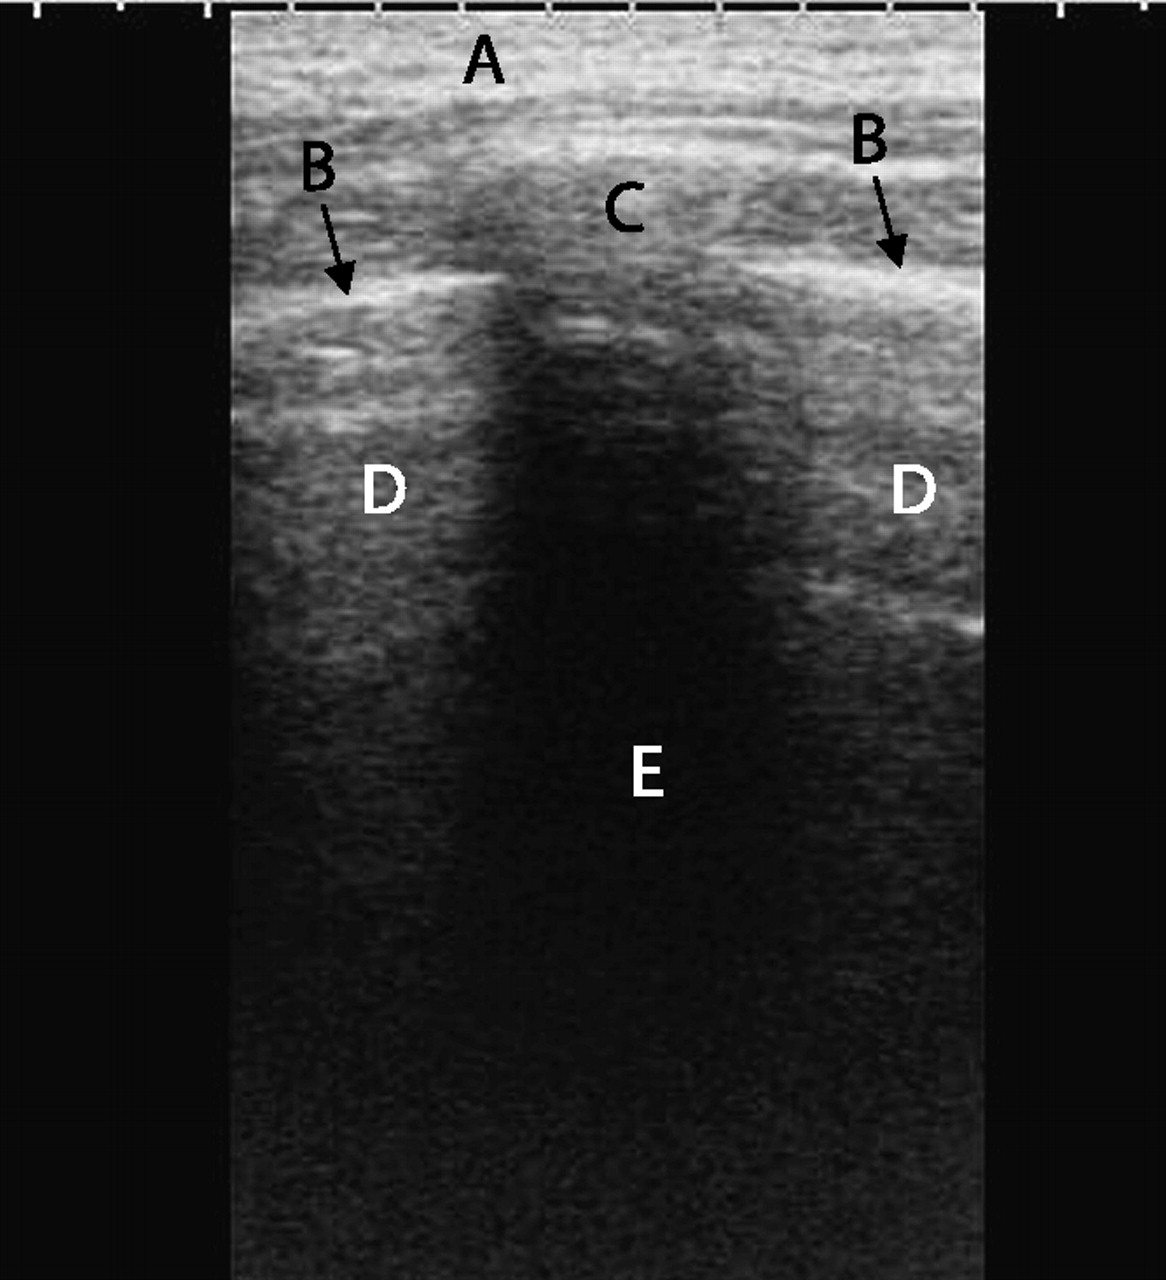
Normal lung with acoustic rib shadows: A, soft tissues; B, pleura; C, rib; D, normal lung; E, acoustic rib shadow.
Abnormal thoracic ultrasound appearance
Pleural effusion
Ultrasound has a higher sensitivity in the detection of a pleural effusion than clinical examination or chest x-rays including a lateral decubitus film.105 The ultrasound appearance of a pleural effusion is an anechoic or hypoechoic area between the parietal and visceral pleura that changes shape with respiration (figure 6A).106 107 Other sonographic characteristics of pleural fluid are swirling echo densities, flapping or swaying ‘tongue-like’ structures due to underlying compressive atelectasis of the lung and movable septae.106 Depending upon its internal echogenicity and the presence of septations, a pleural effusion can be classified into anechoic if totally echo-free, complex non-septated if echogenic swirling densities are present, or complex septated if fine strands are present within the fluid (figure 6B).103 108 Anechoic effusions can be either transudates or exudates, but complex effusions are always exudates.103
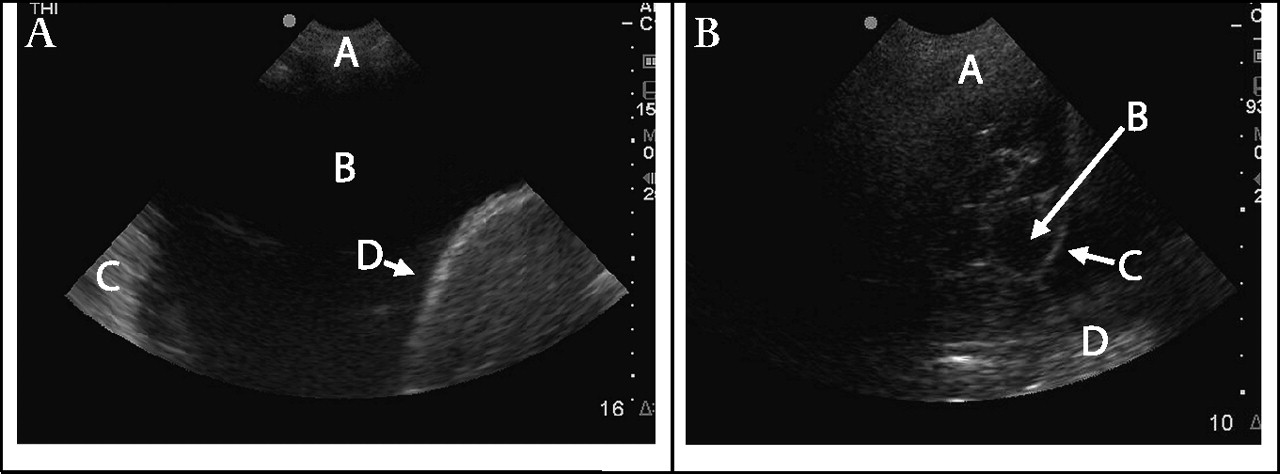
Pleural effusions. (A) Large anechoic pleural effusion: A, thoracic wall; B, pleural effusion; C, lung; D, diaphragm. (B) Loculated pleural effusion: A, thoracic wall; B, pleural fluid within a locule; C, wall of locule; D, lung.
The volume of pleural fluid can be calculated using various formulae, but these are mainly applicable to patients receiving mechanical ventilation109 110 and are difficult to apply in practice to non-ventilated patients. The following alternative classification has been suggested by Tsai et al111: (1) minimal if the echo-free space is within the costophrenic angle; (2) small if the echo-free space extends over the costophrenic angle but is still within a single probe range; (3) moderate if the echo-free space is between a one to two probe range; and (4) large if the space is bigger that a 2 probe range. Furthermore, a pleural effusion is usually considered too small to tap if it is <1 cm in depth.106
Pleural thickening
Occasionally a minimal pleural effusion can be hard to distinguish from pleural thickening which may manifest as an anechoic or hypoechoic stripe. The presence of a chaotic linear colour band between the visceral and parietal pleura using colour Doppler has a higher sensitivity for detecting pleural fluid than grey scale ultrasound alone and this is known as the ‘fluid colour sign’.112 113 However, the routine application and interpretation of this is likely to be beyond the expertise of the non-radiologist.
Malignant pleural effusion
Thoracic ultrasound can facilitate the diagnosis of a malignant pleural effusion. The presence of pleural or diaphragmatic thickening or nodularity99 114 or an echogenic swirling pattern in patients with known malignancy115 is highly suggestive of a malignant pleural effusion.
Pulmonary consolidation
Pulmonary consolidation is sonographically visible in the presence of adjacent pleural effusion acting as an acoustic window or if directly abutting the pleura (figure 7). It appears as a wedge-shaped irregular echogenic area with air or fluid bronchograms.116 117 On colour Doppler ultrasound, branching tubular structures with colour flow is visible.113

Lung consolidation with pleural effusion. A, thoracic wall; B, pleural effusion; C, consolidated lung; D, air bronchograms.
Parapneumonic effusions and empyema
Parapneumonic effusions are usually hyperechoic with septae but can be hyperechoic without septae and even anechoic.118 Ultrasound is better than CT at demonstrating septae.118 However, CT is preferred in complex pleuroparenchymal disease as it is better at delineating the relationship between loculated pleural collections, parenchymal consolidation and the mediastinum.119 The presence of septae does not imply loculations as the fluid may still be free flowing within the hemithorax.118
In a study of 36 patients with proven parapneumonic effusion or empyema, Kearney et al did not find any correlation between the ultrasound appearance and Light's stages of empyema, the presence of pus or the need for surgical intervention.118 In contrast, two other studies have shown that septated parapneumonic effusions have a poorer outcome.120 121 Chen et al showed that sonographically visible septations were associated with a longer hospital stay, longer chest tube drainage, higher likelihood of fibrinolytic therapy and surgical intervention120 and Shankar et al found that a complex septated parapneumonic effusion had a 62.5% resolution rate with chest tube drainage compared with 81.5% with a complex non-septated parapneumonic effusion.121
Ongoing pleural infection despite adequate antibiotic therapy is often due to suboptimal placement of the chest drain, particularly in the presence of loculations.122 Two studies have demonstrated the utility of ultrasound-guided chest drainage as the principal treatment for parapneumonic effusion or empyema with an overall success rate of 78%121 and 72%.80 Factors associated with failure were small-bore chest tube blockage, persistent pneumothorax or a pleural peel.80
Pneumothorax
The presence of a pneumothorax and hydropneumothorax can be inferred sonographically by the absence of pleural ‘sliding’ and the presence of reverberation artefact.123 124 The utility of thoracic ultrasound for diagnosing a pneumothorax is limited in hospital practice due to the ready availability of chest x-rays and conflicting data from published reports. In a study of 53 patients following a transbronchial biopsy or chest drain removal, thoracic ultrasound using a high-frequency transducer and apical scans had a sensitivity and specificity of 100% for the detection of post-procedure pneumothorax compared with a chest x-ray or CT scan of the thorax.124 An earlier report comparing ultrasound with CT scanning showed a lesser sensitivity following lung biopsy,125 and a recently published report suggested that ultrasound was less sensitive and specific in patients with emphysema.126
Thoracic ultrasound technique
The technique for thoracic ultrasound is well described in several review articles102 104 111 and by Koh et al in an online review article containing images and videos.127 The patient should be positioned either in the sitting or lateral decubitus position if critically ill. The chest x-ray should be reviewed before the ultrasound examination.
The ambient lighting should be reduced to maximise screen contrast. In general, a 3.5–5 MHz sector transducer provides good views of intrathoracic and upper abdominal structures including pleural fluid. A 5–10 MHz linear transducer should be selected for detailed examination of the pleura. Acoustic gel should be applied between the transducer and the area to be examined. The transducer should be held like a pen, applying firm pressure upon the skin to maximise acoustic coupling while resting the medial aspect of the palm upon the chest.
The image should be optimised by adjusting the depth, gain and focus. The depth should be adjusted until the area of interest fills the entire screen, while the gain should be increased or decreased to maximise the contrast between different tissues.
Examination should commence with the transducer placed within an interspace on the posterior chest wall on the side of interest. The transducer should be moved obliquely along the interspace (avoiding the acoustic shadow cause by reflection of the ultrasound by the ribs) in both the transverse and longitudinal planes, thereby minimising interference from the acoustic shadow from the ribs. It is imperative that the diaphragm is unequivocally identified before any invasive procedure to avoid inadvertent intra-abdominal penetration. The thorax should be examined posteriorly, laterally and anteriorly, particularly when a loculated pleural effusion is suspected.
The thorax should be examined using grey-scale real-time ultrasound, paying particularly attention to location, sonographic appearance and echogenicity.111 The echogenicity of a lesion is defined relative to the liver which, by definition, is isoechoic. The contralateral thorax can be used as a control except where there is bilateral pleural pathology.
Ultrasound-guided pleural aspiration and chest drain insertion
The identification of a site for pleural aspiration using physical examination can be straightforward in the presence of a large free-flowing pleural effusion, but image guidance is recommended for all procedures as discussed above. When using ultrasound to select a site for aspiration of a pleural effusion, the site chosen should have (1) sufficient depth of pleural fluid (at least 10 mm), (2) no intervening lung at maximal inspiration and (3) minimal risk of puncture of other structures such as the heart, liver and spleen. It should be noted that ultrasound will not prevent inadvertent laceration of the intercostal neurovascular bundle, particularly where they run within the intercostal space medial to the angle of the rib.24
Once a site has been localised, it should be marked either with an indentation or indelible ink and a mental note made of the maximal depth of fluid present and the required angulation of needle insertion. It is preferable to perform the aspiration at the time of the ultrasound rather mark a spot for subsequent aspiration20 as any alteration of the patient's position may significantly alter the relationship between the skin marker and the underlying pleural fluid.20 21 102 Real-time guidance using a free-hand approach may be necessary in small or loculated pleural effusions.
The technique of ultrasound-guided chest drain insertion is similar to that for pleural aspiration. The main purpose of ultrasound is to identify a safe site for aspiration of fluid followed by insertion of the chest drain. The procedure is rarely performed under real-time guidance.
Pleural procedures within the critical care setting
Ultrasound guidance reduces the complications associated with pleural procedures in the critical care setting and its routine use is recommended. (C)
Thoracic ultrasound within the critical care setting is especially useful due to the portability of the equipment when treating and diagnosing relatively immobile patients. Erect and, less commonly, decubitus chest x-rays are frequently used to diagnose pleural effusions. However, these views are rarely possible in critically ill patients. Diagnosis of pleural effusions on supine films is much more challenging and frequently inaccurate.128 The use of bedside ultrasound by appropriately trained intensivists has been shown to safely identify and guide aspiration of pleural effusions in mechanically ventilated patients.129 Of the 44 effusions that were aspirated during this study, the pleural effusion was not evident on a supine chest x-ray in 17 cases.
Ultrasound guidance is strongly recommended in this setting, not only because the diagnosis of pleural effusions is more difficult but also because the consequence of complications is often more serious. With ultrasound-guided procedures the complication rate is similar to procedures undertaken in other settings.101 102
Thoracic ultrasound training
At least level 1 competency is required to safely perform independent thoracic ultrasound. (✓)
Thoracic ultrasound is a very operator-dependent procedure where imaging acquisition and interpretation are carried out simultaneously. There is little evidence to specify the length of training required for a non-radiologist to become competent in basic thoracic ultrasound.130 In the UK the Royal College of Radiologists has published guidelines establishing the minimum standards required to achieve basic or level 1 competency in thoracic ultrasound.131 Although the guideline defines a minimum number of supervised procedures, it should be recognised that some individuals may require more supervision to achieve competency in thoracic ultrasound. An additional 100 scans to achieve level 2 standard or 2 years further experience at level 1 standard would allow the individual to train others to level 1 thoracic ultrasound standard.
In practice, more scans are required beyond level 1 competency to achieve a reasonable level of expertise in thoracic ultrasound, particularly where there is loculated pleural fluid. It is advisable for the novice to start with patients with simple free-flowing pleural effusions before moving on to patients with complex pleural or pleuroparenchymal disease.102 The images should be correlated with the CT scan of the thorax or advice should be sought from a radiologist if the individual is unable to interpret the acquired images.
References
Footnotes
Competing interests No member of the Guideline Group is aware of any competing interests.
Provenance and peer review The draft guideline was available for online public consultation (July/August 2009) and presented to the BTS Winter Meeting (December 2009). Feedback was invited from a range of stakeholder institutions (see Introduction). The draft guideline was reviewed by the BTS Standards of Care Committee (September 2009).